Thursday, June 9, 2011

আপনার কম্পিউটারকে দিয়ে কথা বলান সহজে


এই কাজটির জন্য অনেক প্রফেশন্যাল সফটওয়ার আছে, তবে নিচের সামান্য ভিসুয়াল বেসিক স্ক্রিপ্ট দিয়ে আপনি কাজটা অনায়াসে করতে পারেন।

১) Notepad প্রোগ্রামটি খুলুন।
২) নিচের code টি হুবহু কপি/পেষ্ট করুন।


Code:
Dim msg, sapi

msg=InputBox("Enter your text","Talk it")

Set sapi=CreateObject("sapi.spvoice")

sapi.Speak msg
৩) ফাইলটি সেভ করুন এবং speak.vbs নামকরণ করুন।
৪) speak.vbs ফাইলটি খুলুন। খুললে একটি pop-up স্ক্রিনের আগমন ঘটবে।
৫) ইংরেজীতে কিছু টাইপ করে OK বোতাম টিপুন আর আপনার লিখিত শব্দগুলি শুনুন।

খুবই কার্যকরী বিশেষ করে স্বল্প দৈর্ঘের কোনো টেক্স পড়ার কাজে। মনে করুন একটা ইংরেজী শব্দের প্রকৃত উচ্চারন কি হবে সেটা আপনি সঠিকভাবে বুঝতে পারছেন না।
শুধু শব্দটি pop-up boxএ টাইপ করে OKতে ক্লিক করলেই আপনার স্পিকার/হেডফোনে আপনি শব্দটি শুনতে পাবেন।
সব Windows vessionএর সাথেই কাজ করবে।

একটি মজার ট্রিকস্!

নিচের কোডটি কপি করে আপনার ব্রাউজার (শুধু মাত্র মজিলা ফায়ারফক্স এবং ইন্টারনেট এক্সপ্লোর এ কাজ করে) এর এড্রেস বারে পেস্ট করে ইন্টার চাপুন। এরপর মজা দেখুন!

javascript:function Shw(n) {if (self.moveBy) {for (i = 35; i > 0; i--) {for (j = n; j > 0; j--) {self.moveBy(1,i);self.moveBy(i,0);self.moveBy(0,-i);self.moveBy(-i,0); } } }} Shw(70)

নিজের পছন্দের কন্ট্রোল প্যানেল

কন্ট্রোল প্যানেল নিয়ে আমাদের মাঝে মাঝে কাজ করতে হয়। কাজের সুবিধার জন্য প্রয়োজনীয় কন্ট্রোলগুলো নিয়ে আলাদা একটি কন্ট্রোল প্যানেল স্টার্ট মেনুতে করে রাখলে একটু সময় কম লাগবে। এজন্য স্টার্ট বাটনে মাউসের ডান বাটন ক্লিক করে Explore All Users এ ক্লিক করুন। এবার My Control Panel নামে একটি ফোল্ডার তৈরী করে খুলুন। এরপরে আসল কন্ট্রোল প্যানেল খুলে Classic View হিসাবে দেখুন। এবার কন্ট্রোল প্যানেলের পছন্দের কন্ট্রোলগুলো ড্রাগ করে তৈরী করা ফোল্ডারে আনুন। ব্যাস; এখন কন্ট্রোল প্যানেল না খুলে Start > My Control Panel থেকে কন্ট্রোলগুলো ব্যবহার করতে পারবেন।। চাইলে এগুলোর শর্টকাট তৈরী করে ব্যবহার করতে পারবেন।

আসুন জেনে নিই Graphics Card এর আদ্যোপান্ত

পাওয়ার সাপ্লাই:
গ্রাফিক্স কার্ড হল বিশিষ্ট পাওয়ার খাদক। যাদের ভালো গ্রাফিক্স কার্ড আছে তারা ভালো জানেন যে এটা কী পরিমাণ এনার্জি খায় এবং গরম হয়। গ্রাফিক্স কার্ড থেকে ভালো আউটপুট পেতে অবশ্যই ভালো মানের পাওয়ার সাপ্লাই ব্যাবহার করা প্রয়োজন। মনে রাখা দরকার যে কেসিং এর সাথে যে পাওয়ার সাপ্লাই ইউনিট দেওয়া থাকে সেটা কখনোই আসল নয়। জেনে রাখুন যে ৪০০ ওয়াটের পাওয়ার সাপ্লাইয়ের দাম কয়েক হাজার টাকা। সেখানে একটা কেসিং মাত্র দেড় বা দুই হাজার টাকা দামের হয়। ভাল ব্র্যান্ডের যেমন থার্মালটেক এর পাওয়ার সাপ্লাই ব্যাবহার করলে ভালো হবে।

নিচের ছবিটা দেখুন গ্রাফিক্স কার্ড এতটাই গরম হয় যে ডিমও সেদ্ধ হয়ে যাচ্ছে।

http://lh3.googleusercontent.com/_IB...gg_cooking.jpg
বিল্ট-ইন গ্রাফিক্স কার্ড নিয়ে কিছু কথা

বলতে গেলে প্রতিটা মাদারবোর্ডেই বিল্ট-ইন জিপিইউ থাকে। এটা আসলে প্রসেসরের কিছু অংশ ব্যাবহার করে ভিডিও প্রসেস করতে। আর ফিজিকাল র্যামের একটা অংশ ব্যাবহার করে ভি-র্যাম হিসেবে। এটার কোর ক্লক স্পীড খুবই কম হয়। এই গ্রাফিক্স কার্ড দিয়ে চলার মত সকল কাজ করা গেলে কখনোই রিচ-অ্যাপ্লিকেশান চালানো সম্ভব নয়। তাই কম ক্ষমতার হলেও আলাদা গ্রাফিক্স কিনে নেওয়াই উত্তম।
গ্রাফিক্স কার্ডের কতগুলো বিষয় যা দেখে কিনবেন

  • ট্রানজিস্টর সংখ্যা: কার্ডে যত বেশি ট্রানজিস্টর থাকবে, নয়েজ তত কম হবে, ভিডিও তত বেশি ভালোভাবে ফিল্টার হবে।
  • ক্লক স্পীড: এটা যত ভালো এবং বেশি হবে তত ভাল পারফরমেনস পাবেন। এটার দিকে নজর দিন।
  • মেমরি: এটাও আগে আলোচনা করেছি। এখন ১ জিবি থেকে ৪ জিবি পর্যন্ত কার্ড পাওয়া যাচ্ছে। আপনার কাজের ধরন অনুযায়ী দেখুন কোনটা লাগে। মেমরি টাইপ: DDR, DDR2, GDDR3, GDDR4, নাকি GDDR5 তা দেখে নিন। যত ভালো হবে, তত ভালো পারফরমেন্স পাবেন। অবশ্য GDDR5 এর দাম একটু বেশি। জেনে রাখুন যে আপনার মাদারবোর্ড এর র্যাম DDR2 না DDR3 তার সাথে এটার কোন সম্পর্ক নেই।
  • বাস স্পীড: মেমরি বাস হল প্রসেসরটি একবারে কতটুকু ডাটা নিয়ে কাজ করে। বাস বেশি হলে খুব দ্রুত আউটপুট পাবেন। আবার বাস খুব বেশি হলে পাওয়ার খরচ তো বেশি হবেই, তার উপর আপনার মনিটর ছোট হলে বাস অব্যাবহৃত থাকবে।
  • পিসিআই ভার্সন: আপনার মাদারবোর্ড এর স্লট কোনটি তা দেখে কিনবেন। ধরুন আপনার PCIe x8, কিন্তু আপনি PCIe x16 2.0 কিনে আনলেন। তাহলে সেটা কাউকে দিয়ে দেওয়া ছাড়া উপায় নেই।
  • ডিরেক্ট এক্স সাপোর্ট: ডিরেক্ট এক্স হল মাইক্রোসফট এর অনন্য সংযোজন। নতুন নতুন হার্ডওয়্যার, ভিডিও এক্সিলারেশানের জন্য এটি অপরিহার্য। এর নতুন ভার্সন ১১। তাই গ্রাফিক্স কার্ড নতুন ভার্সন এর ডিরেক্ট এক্স সাপোর্ট করে কিনা দেখে নিন।
  • পিক্সেল শেডার: ভিন্ন মাত্রার পিক্সেল এবং আলোর তুলনামূলক প্রসেসিং এবং বৈশিষ্ট্য তুলে ধরতে পিক্সেল শেডার প্রয়োজন। আপনার গ্রাফিক্স কার্ড কত সাপোর্ট করে তা দেখে নিবেন। বর্তমানে এর ৫ ভার্সন রয়েছে।
  • ওপেন জি-এল: এটি হল ভিডিও প্রসেসিং-র জন্য অসংখ্য লাইব্রেরি ফাংশনের সমাহার, যেটা আউটপুটকে আরো দ্রুততর করে। কেনার সময় এটা সাপোর্ট করে কিনা এবং কত ভার্সন তা দেখে নিবেন।
  • অ্যান্টি-অ্যালাইজিং: এটা ব্যাবহার করে ছবির ফেটে যাওয়া বা ঘোলাটে ভাব দূর করা যায়। বিভিন্ন গেম ও অ্যাপ এ এটা খুবই ব্যাবহৃত হয়। তাই এই ফিচার আছে কিনা দেখে নিন।
  • ম্যাক্স আউটপুট: আপনার মনিটর যদি ১৬০০ বাই ১২০০ রেজোলিউশানের হয় তাহলে নিশ্চয়ই ১০২৪ বাই ৭৬৮ আউটপুটের গ্রাফিক্স কিনবেন না। বর্তমানে সব কার্ডের আউটপুট ১৬০০ বাই ১২০০ থেকে ২৫৬০ বাই ১৬০০ এর মাঝে।তাই এটা আপাতত অত ভাবনার বিষয় না।
  • পাওয়ার ফ্যাক্টর: কার্ডটি কত ওয়াট সাপ্লাই চায় তা দেখুন। প্রয়োজনীয় পাওয়ার দিতে না পারলে কাজ করতে যেয়ে আটকে যাবে। ক্ষতিও হতে পারে। সাধারনত ৪০০ থেকে ৮০০ ওয়াট সাপ্লাই দরকার। লাগলে আপনার পিএসইউ আপডেট করুন।
  • মাল্টি আউটপুট: আপনি যদি একসাথে দুই বা ততোধিক মনিটরে দেখতে চান তাহলে এটা আপনার দরকার। খেয়াল করে দেখবেন যে প্রায় সব কার্ডেই দুই বা তিনের বেশি পোর্ট থাকে। এগুলো দেওয়া হয় যেন একই সাথে সকল মনিটরে দেখা সম্ভব হয়।
  • রিফ্রেশ রেট: আউটপুট কত রেটে পাবেন, অর্থাৎ মনিটরে কত হার্টজে ভিডিও আসবে তা দেখে নিন। এর ডিফল্ট মান ৬০। তবে সিআরটি মনিটরে ৬০ এর নিচে দাগ বা ফ্লিকিং দেখা যায়। কিছু মনিটর ৭৫ হার্টজ এর নিচে দেখাতে সক্ষম না। তাই আপনার মনিটর এর জন্য কোনটা দরকার তা দেখে নিবেন।
  • মাল্টি-জিপিইউ: এটা ডাই-হার্ড গেমারদের জন্য। যদি একটা ভিডিও কার্ড নিয়ে আপনার মন না ভরে তাহলে একের বেশি কার্ড লাগানো সম্ভব এরকম কার্ড কিনুন। আর সেই সাথে মাল্টি
    -জিপিইউ সাপোর্ট করে এরকম মাদারবোর্ডও কিনতে হবে আপনাকে। এনভিডিয়া আর এএমডি দুটাই মাল্টি-জিপিইউ সিস্টেম সাপোর্টেড চিপ তৈরী করে।
  • এনার্জি সেভিং: আপনার চিপটি কাজের পাশাপাশি দূর্ণীতি করে আপনার বিদ্যুৎ বিল উঠাচ্ছে কিনা তার দিকে খেয়াল রাখবেন। এই জন্য এনার্জি স্টারের রেটিং দেখে কার্ড কিনুন।
  • সফটওয়্যার সাপোর্ট: আপনি যে সিস্টেম এ কাজ করেন সেই সিস্টেমে কার্ড এর ড্রাইভার পাবেন কিনা তা দেখে নিন। এখন
    এএমডি উইন্ডোজ, লিনাক্স আর ম্যাকের জন্য অফিসিয়ালি ড্রাইভার দিচ্ছে। তাই পছন্দ আপনার।

Run Commands In Windows XP

Run Commands In Windows XP
You can access all these programs by going through START-->RUN or Simply Click Windows Key+R

SQL Client Configuration - cliconfg
System Configuration Editor - sysedit
System Configuration Utility - msconfig
System File Checker Utility (Scan Immediately)- sfc /scannow
System File Checker Utility (Scan Once At Next Boot)- sfc /scanonce
System File Checker Utility (Scan On Every Boot) - sfc /scanboot
System File Checker Utility (Return to Default Setting)- sfc /revert
System File Checker Utility (Purge File Cache)- sfc /purgecache
System File Checker Utility (Set Cache Size to size x)-sfc/cachesize=x
System Information - msinfo32.
Task Manager – taskmgr
System Properties - sysdm.cpl
Task Manager – taskmgr
TCP Tester - tcptest
Telnet Client - telnet
Tweak UI (if installed) - tweakui
User Account Management- nusrmgr.cpl
Utility Manager - utilman
Windows Address Book - wab
Windows Address Book Import Utility - wabmig
Windows Backup Utility (if installed)- ntbackup
Windows Explorer - explorer
Windows Firewall- firewall.cpl
Windows Magnifier- magnify
Windows Management Infrastructure - wmimgmt.msc
Windows Media Player - wmplayer
Windows Messenger - msmsgs
Windows Picture Import Wizard (need camera connected)- wiaacmgr
Windows System Security Tool – syskey
Windows Update Launches - wupdmgr
Windows Version (to show which version of windows)- winver
Windows XP Tour Wizard - tourstart
Wordpad - write
Password Properties - password.cpl
Performance Monitor - perfmon.msc
Phone and Modem Options - telephon.cpl
Phone Dialer - dialer
Pinball Game - pinball
Power Configuration - powercfg.cpl
Printers and Faxes - control printers
Printers Folder – printers
Private Character Editor - eudcedit
Quicktime (If Installed)- QuickTime.cpl
Real Player (if installed)- realplay
Regional Settings - intl.cpl
Registry Editor - regedit
Registry Editor - regedit32
Remote Access Phonebook - rasphone
Remote Desktop - mstsc
Removable Storage - ntmsmgr.msc
Removable Storage Operator Requests - ntmsoprq.msc
Resultant Set of Policy (XP Prof) - rsop.msc
Scanners and Cameras - sticpl.cpl
Scheduled Tasks - control schedtasks
Security Center - wscui.cpl
Services - services.msc
Shared Folders - fsmgmt.msc
Shuts Down Windows - shutdown
Sounds and Audio - mmsys.cpl
Spider Solitare Card Game - spider
Malicious Software Removal Tool - mrt
Microsoft Access (if installed) - access.cpl
Microsoft Chat - winchat
Microsoft Excel (if installed) - excel
Microsoft Frontpage (if installed)- frontpg
Microsoft Movie Maker - moviemk
Microsoft Paint - mspaint
Microsoft Powerpoint (if installed)- powerpnt
Microsoft Word (if installed)- winword
Microsoft Syncronization Tool - mobsync
Minesweeper Game - winmine
Mouse Properties - control mouse
Mouse Properties - main.cpl
Nero (if installed)- nero
Netmeeting - conf
Network Connections - control netconnections
Network Connections - ncpa.cpl
Network Setup Wizard - netsetup.cpl
Notepad - notepad
Nview Desktop Manager (If Installed)- nvtuicpl.cpl
Object Packager - packager
ODBC Data Source Administrator- odbccp32.cpl
On Screen Keyboard - osk
Opens AC3 Filter (If Installed) - ac3filter.cpl
Outlook Express - msimn
Paint – pbrush
Keyboard Properties - control keyboard
IP Configuration (Display Connection Configuration) - ipconfi/all
IP Configuration (Display DNS Cache Contents)- ipconfig /displaydns
IP Configuration (Delete DNS Cache Contents)- ipconfig /flushdns
IP Configuration (Release All Connections)- ipconfig /release
IP Configuration (Renew All Connections)- ipconfig /renew
IP Configuration(RefreshesDHCP&Re-RegistersDNS)-ipconfig/registerdns
IP Configuration (Display DHCP Class ID)- ipconfig/showclassid
IP Configuration (Modifies DHCP Class ID)- ipconfig /setclassid
Java Control Panel (If Installed)- jpicpl32.cpl
Java Control Panel (If Installed)- javaws
Local Security Settings - secpol.msc
Local Users and Groups - lusrmgr.msc
Logs You Out Of Windows - logoff.....
Accessibility Controls - access.cpl
Accessibility Wizard - accwiz
Add Hardware - Wizardhdwwiz.cpl
Add/Remove Programs - appwiz.cpl
Administrative Tools control - admintools
Adobe Acrobat (if installed) - acrobat
Adobe Designer (if installed)- acrodist
Adobe Distiller (if installed)- acrodist
Adobe ImageReady (if installed)- imageready
Adobe Photoshop (if installed)- photoshop
Automatic Updates - wuaucpl.cpl
Bluetooth Transfer Wizard – fsquirt
Calculator - calc
Certificate Manager - certmgr.msc
Character Map - charmap
Check Disk Utility - chkdsk
Clipboard Viewer - clipbrd
Command Prompt - cmd
Component Services - dcomcnfg
Computer Management - compmgmt.msc
Control Panel - control
Date and Time Properties - timedate.cpl
DDE Shares - ddeshare
Device Manager - devmgmt.msc
Direct X Control Panel (If Installed)- directx.cpl
Direct X Troubleshooter- dxdiag
Disk Cleanup Utility- cleanmgr
Disk Defragment- dfrg.msc
Disk Management- diskmgmt.msc
Disk Partition Manager- diskpart
Display Properties- control desktop
Display Properties- desk.cpl
Display Properties (w/Appearance Tab Preselected)- control color
Dr. Watson System Troubleshooting Utility- drwtsn32
Driver Verifier Utility- verifier
Event Viewer- eventvwr.msc
Files and Settings Transfer Tool- migwiz
File Signature Verification Tool- sigverif
Findfast- findfast.cpl
Firefox (if installed)- firefox
Folders Properties- control folders
Fonts- control fonts
Fonts Folder- fonts
Free Cell Card Game- freecell
Game Controllers- joy.cpl
Group Policy Editor (XP Prof)- gpedit.msc
Hearts Card Game- mshearts
Help and Support- helpctr
HyperTerminal- hypertrm
Iexpress Wizard- iexpress
Indexing Service- ciadv.msc
Internet Connection Wizard- icwconn1
Internet Explorer- iexplore
Internet Setup Wizard- inetwiz
Internet Properties- inetcpl.cpl

Saturday, June 4, 2011

How to format and Reinstall Windows Vista

In this tutorial we will be installing clean version of Windows Vista.
Usually people format windows vista in try to fix their system, repair some functionality or upgrade from windows XP.
Recommended: If you are not sure about your computer hardware compatibility with Windows Vista, get this Upgrade Advisor and check your system compatibility. Next make sure that you have the Drivers CD (that came when you’ve purchased your PC), or if you don’t have them, download the latest Vista drivers for your hardware (you can find them at the support section of your hardware manufacturer, remember to save them to different partition than “C:” (don’t save them in MyDocuments folder, it will get deleted with the formatting), safest way is to store them in other partition than C: (ex. D: , E: , removable drive like USB or burn them on a CD/DVD)
Now after you are sure that your PC is compatible with Vista, and you have all the drivers saved, you can proceed with Formatting Windows Vista.
Step 1. Insert your Windows Vista DVD. The DVD is bootable so after you restart your PC (with the DVD inside) the Windows Vista Setup will begin loading ( if the setup doesn’t start automatically, make another restart and press F2, or F8 after the boot screen and select boot from DVD ).

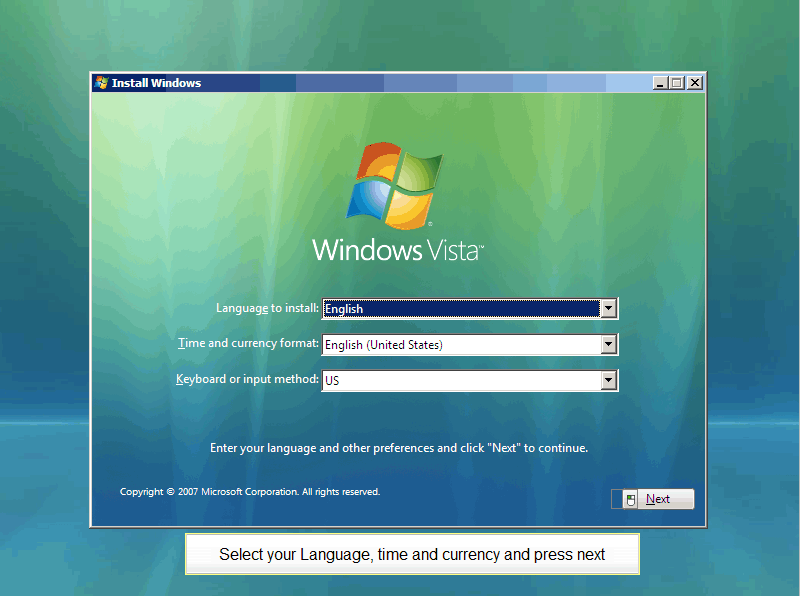
Step 2. The first screen of the Format Windows Vista sequence will show up. At this point you need to select your Language and Time and currency format (click the image to enlarge). Press Next.
Format Windows Vista Select Language and Time
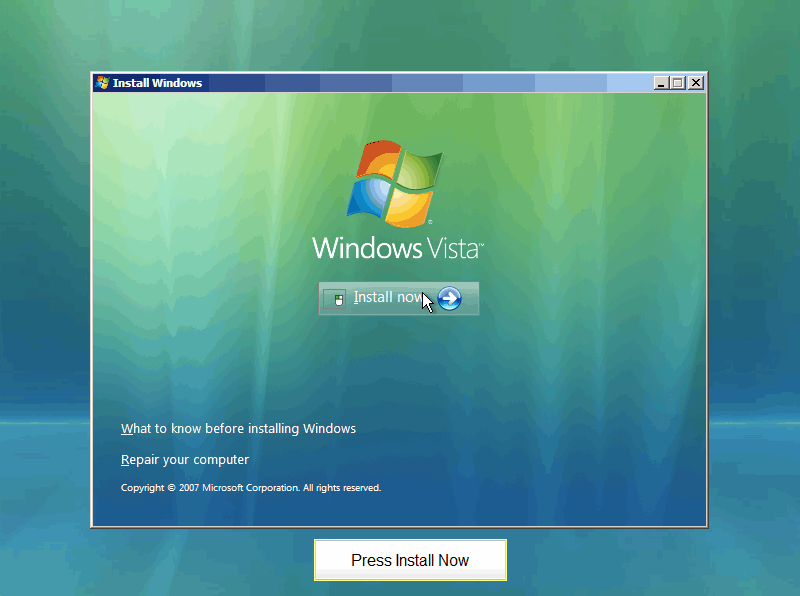
Step 3. Press Install Now
Format Windows Vista Install Now
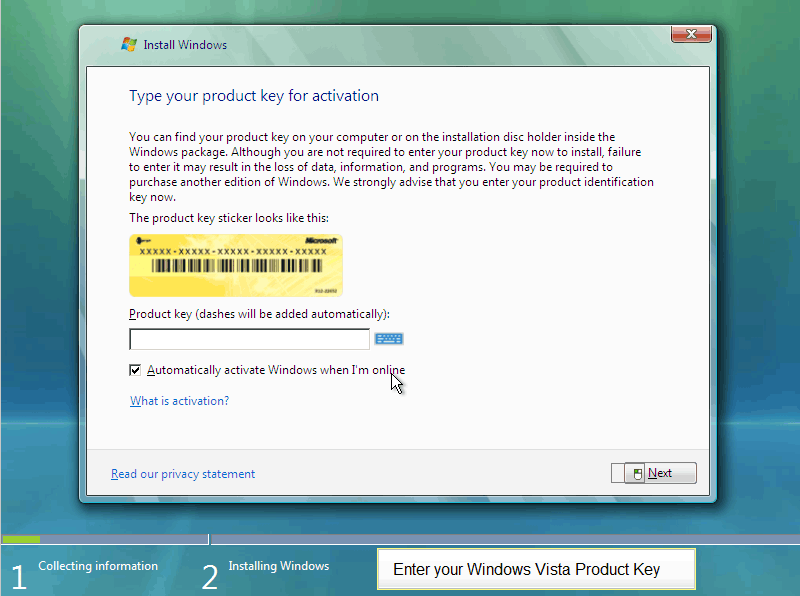
Step 4. After a min you will be asked for your Product Key.
Scenario 1: If you don’t have your product key, you can skip this step and at the next step you will be asked to pick Vista Package that you want to install : Vista Home Basic, Home Premium, Business, Ultimate. If you install windows vista without providing product key, after 14 days you will have to enter a valid product key, or if you don’t, you’ll be forced to format windows vista again. This is good if you want to test which windows vista version is best for you, before your purchase.
Scenario 2: You enter your product key (keep it handy!), and at the next screen your purchased version will be auto-recognized.
Format Windows Vista Enter Product Key
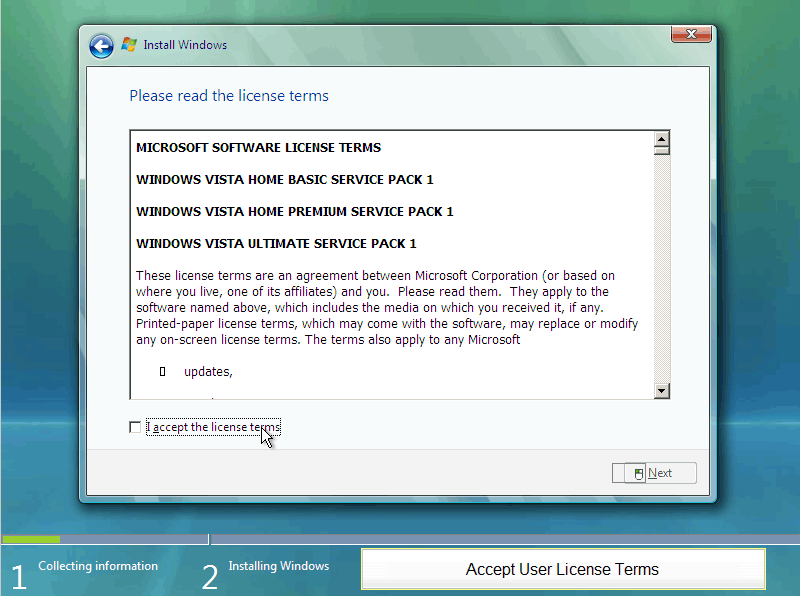
Step 5. Accept the Microsoft Windows User License Terms and press Next
Format Windows Vista Accept User License Terms
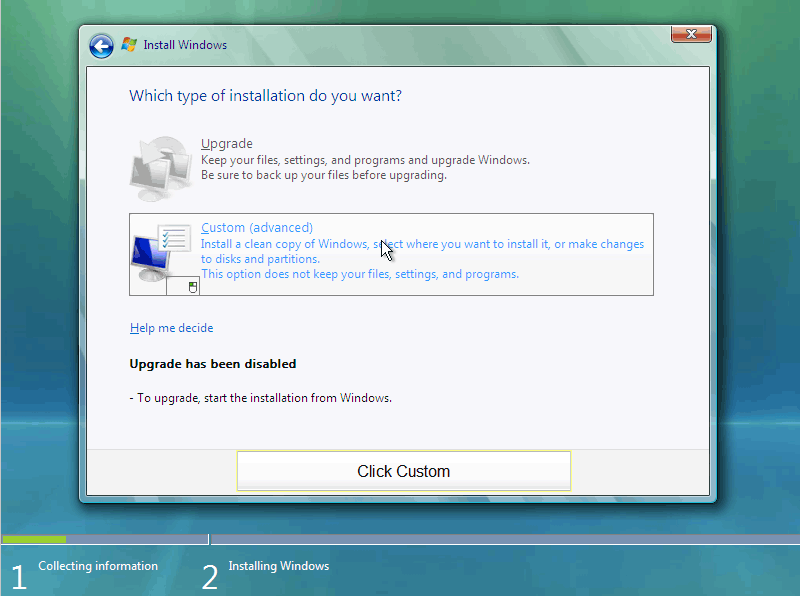
Step 6. Dialog – “Which type of installation do you want ?”
Scenario 1: If you already have another operating system installed (ex. Windows XP) you will have the Upgrade option enabled. It’s up to you to decide if you prefer “clean” install or upgrading from previous Windows Installation. Clean install is recommended for improving system performance, and Upgrade Setup is recommended if you have some files in your C: , My Documents, or Desktop folders that you don’t want deleted.
Scenario 2: You already have operating system installed but you want to format your drive, deleting the old system and installing fresh Windows Vista copy. In that case select the C: drive and press Format ( don’t format all drives! only the primary where we are installing Windows Vista – ” C: “. The setup will do the rest.
Format Windows Vista Click Custom Type
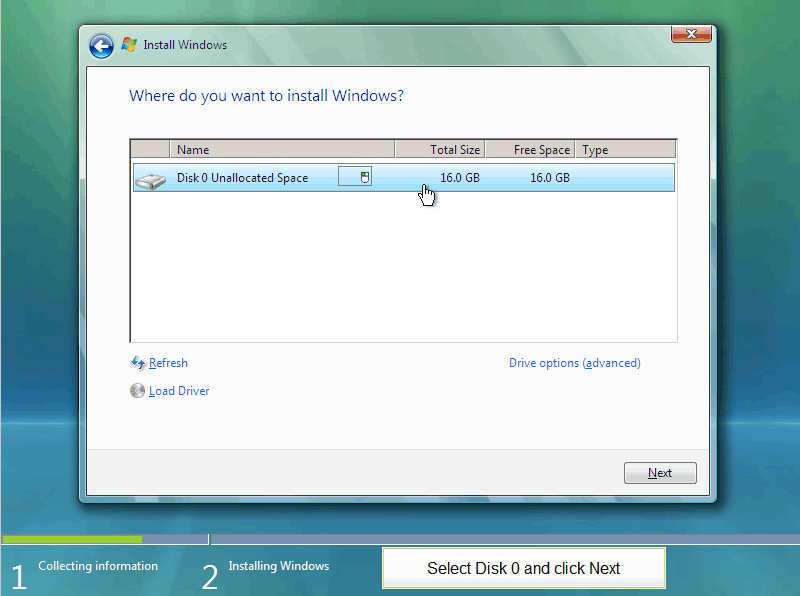
Step 7. Select Disk 0 and click Next
Format Windows Vista Select Disk 0
Step 8. The copy process will begin. This process can take some time, so relax a bit, make a coffee or something :D . Your input won’t be required here for some time.
Format Windows Vista Setup Copying Files
Step 9. After Windows Vista Setup finishes, the computer will reboot.
Format Windows Vista Setup Reboots
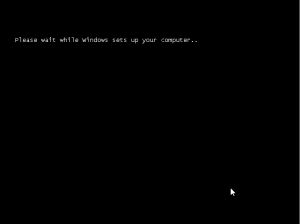
Step 10. Windows Vista files are copied , and now setup will configure Windows Vista for your PC. This step will take some really good time.
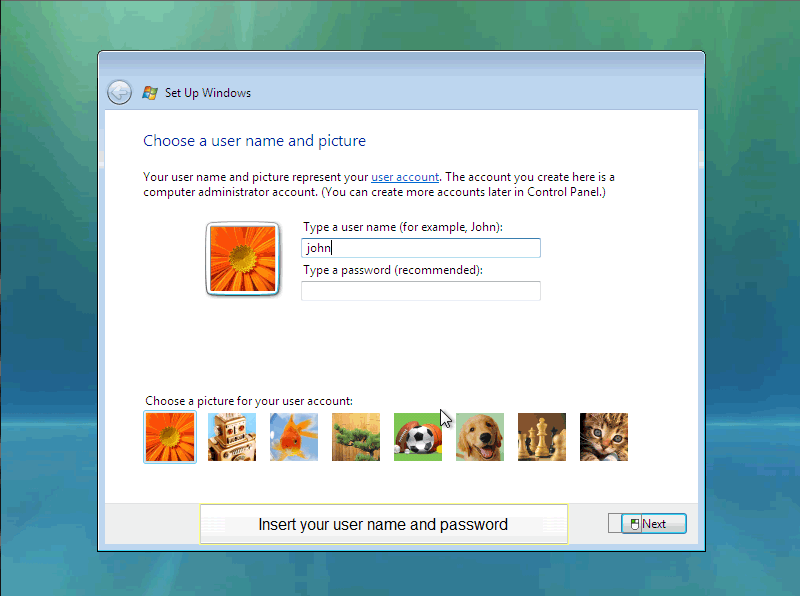
Step 11. Installing Windows Vista finishes, insert your User Name and Password here.
Format Windows Vista Insert User Name Password
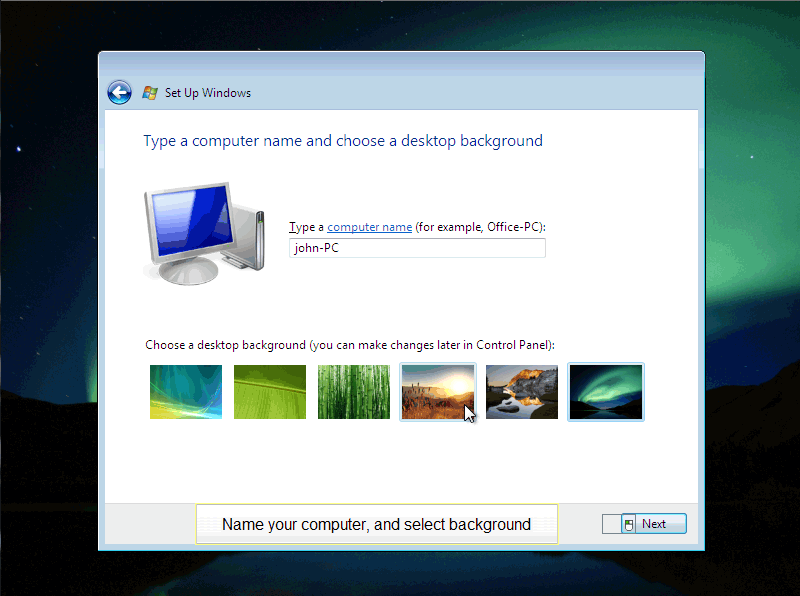
Step 12. Give your PC a name! and select one of the colorful backgrounds
Format Windows Vista Name Your Computer
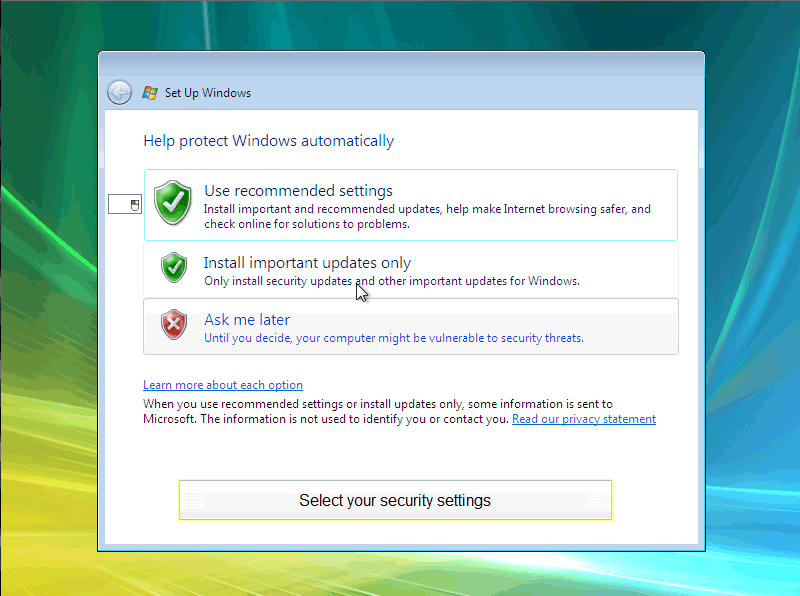
Step 13. Select your preferred security settings. If this computer is not behind a firewall, the best option is the ” Use Recommended settings”. If you are using firewall then you can select “Install important updates only” (Windows Update). If you want to be protected and your Windows Vista to have the latest updates from Microsoft , select the first option.
Format Windows Vista Security Settings
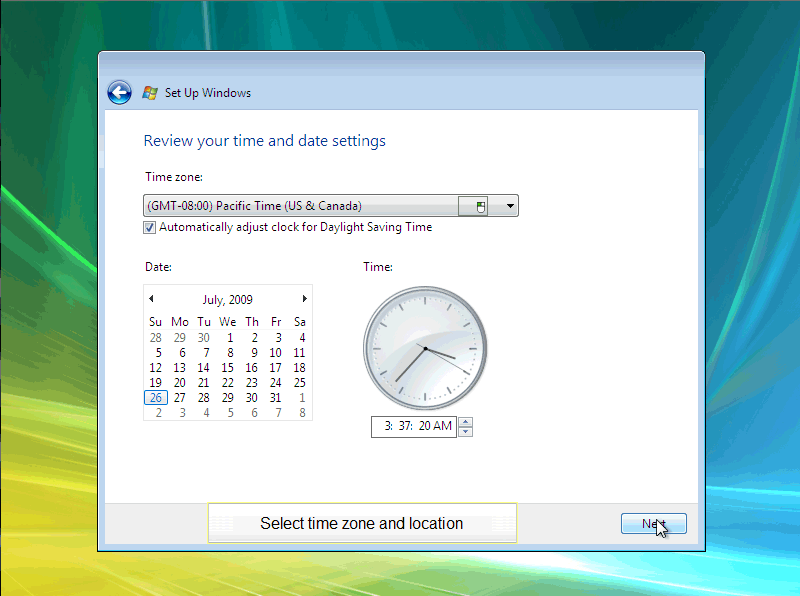
Step 14. Select your time zone and location.
Format Windows Vista Select Time Zone Location
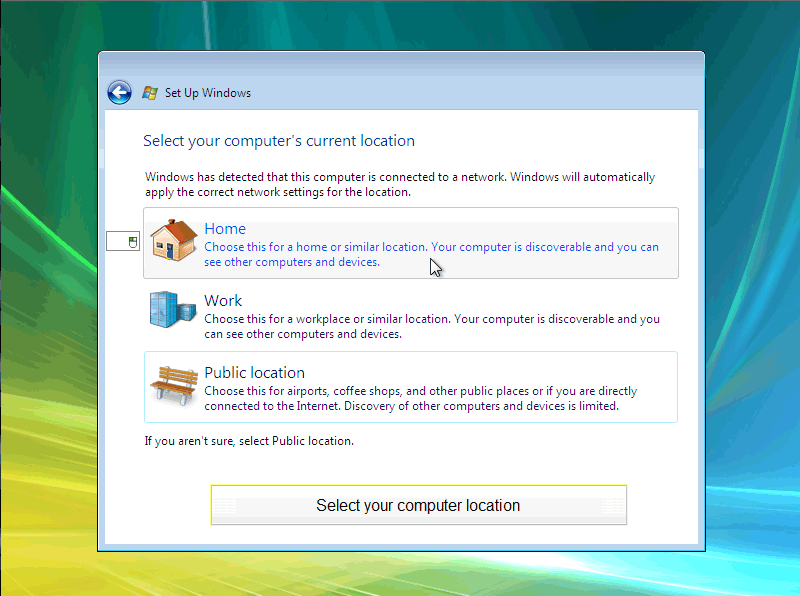
Step 15. Network Configuration – Select your computer location. This settings sets your network permissions.
Format Windows Vista Select Computer Location
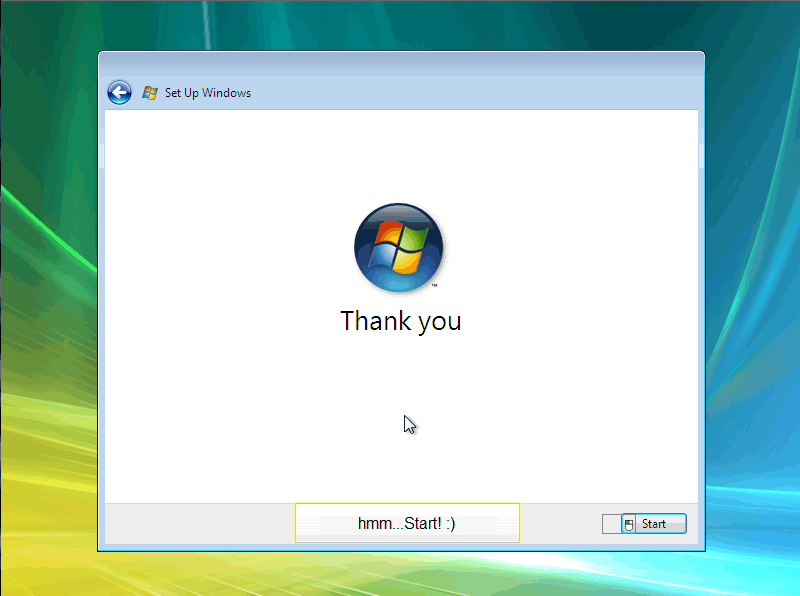
Step 15. This is self explanatory :) Welcome to your new Windows Vista Operating System
Format Windows Vista Setup Finished
Step 16. After you press Start, some Windows Vista settings will be upgraded automatically.
Step 17. You now need to install some drivers that the system will not install automatically.
Thats it! You’ve finished installing Windows Vista.

How to Format and Reinstall Windows XP

Step 1- Installation CD Insert your Windows XP installation disc into your CD or DVD drive.

Step 2 – Restart your computer and start Windows setup using Microsoft Windows bootable XP disk
Tutorial 2: Press any key to boot from CD
Restart your computer. As you computer boots, a screen with message “Press any key to boot from CD..” will show up counting from 9 to 0, here you need to press any key to start the setup. Note: If your computer doesn’t display the “Press any key to boot from CD..” message (by default it should), check your motherboard manual for info where to enable the “Boot from CD” setting, after you enable “Boot from CD” option from your BIOS, the message will show.
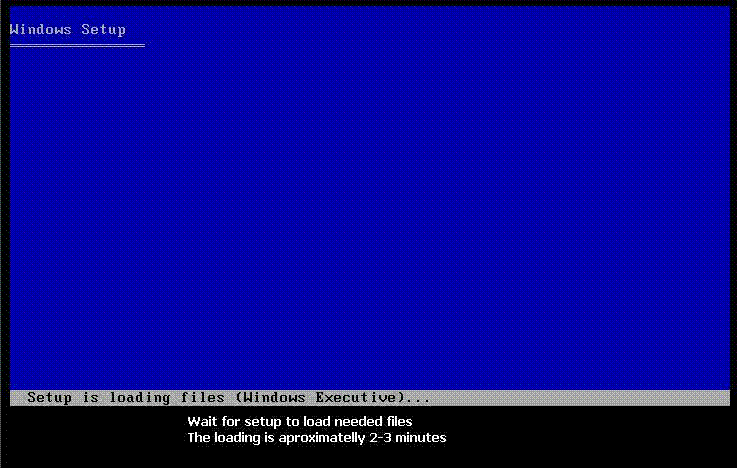
Step 3 – System Loading
Tutorial 3: Windows setup is loading files
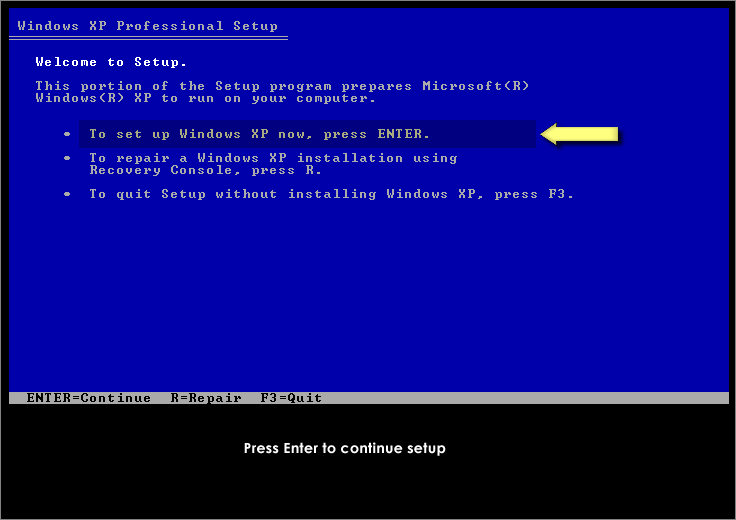
After you enter the setup, the CD will load up a blue screen and will start loading operating system files (this make take few minutes). When it finishes, it will list a few options, “Press ENTER to set up Windows XP now” is the one we need. Click it.
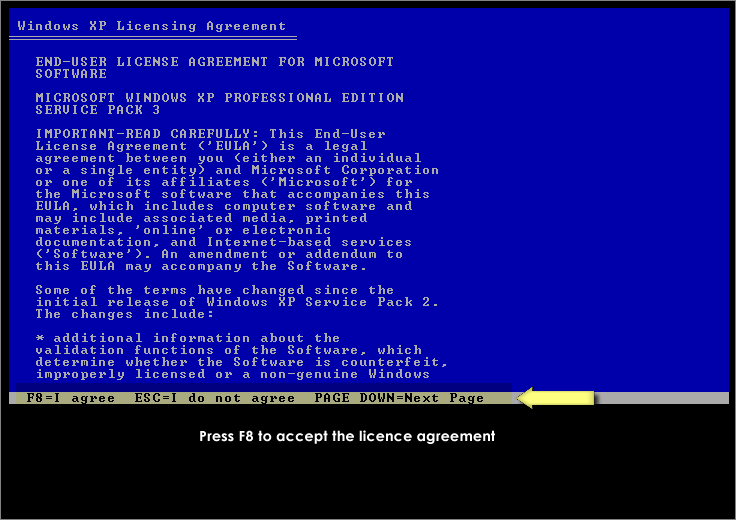
Step 4 – Accept Windows usage agreement
Tutorial 4: Press F8 to accept microsoft licence agreement
Second screen is “The windows usage agreement”. It should be displayed now, showing that you need to press F8 to accept the agreement. Press F8 to accept. How to format a computer
Step 5 – Setup start
Tutorial 5: Press enter to start the windows installation
If an existing Windows XP installation is detected by the system, you are prompted to repair it. We will bypass this step
Step 6 – Delete old partition and format
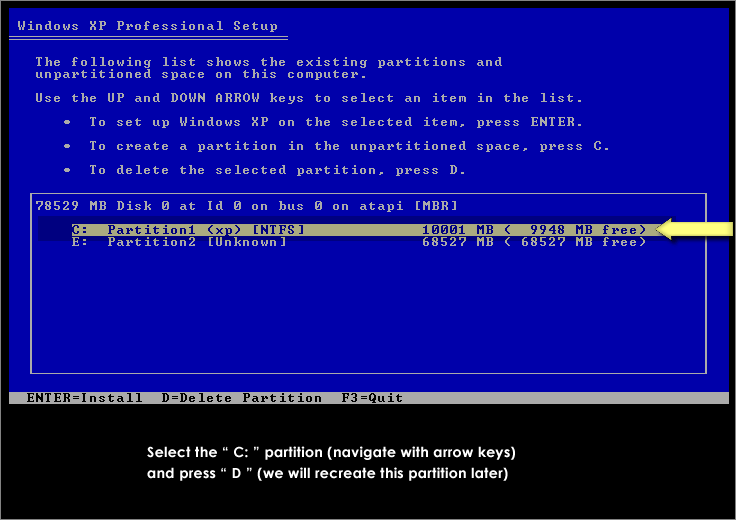
Tutorial 6: Delete existing partition "C"
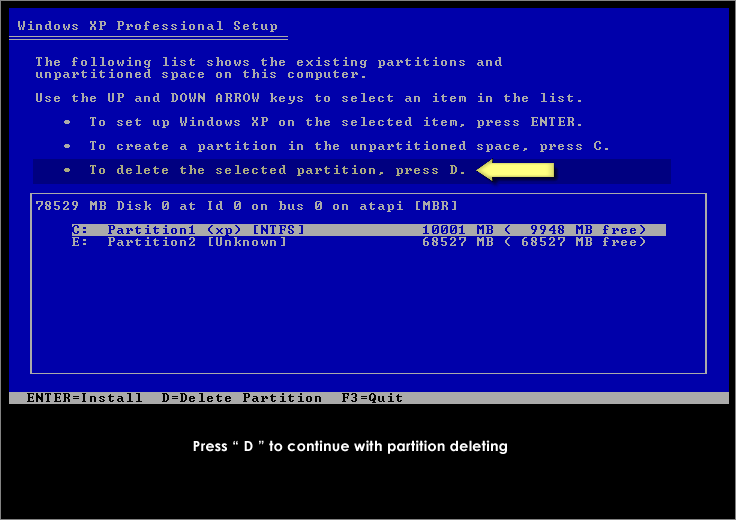
Tutorial 6.1: Confirm deleting of partition - press " D "
Tutorial 5.2: Confirm the deleting by pressing " L "
Tutorial 6.2: Confirm the deleting by pressing " L "
At this point you need to select the partition where you prefer to install Windows Xp. This is where you will delete your partition and format drive C. The box in the lower half of the screen shows all your drives and the partitions that currently exist on your hard disk. Use the Up and Down Arrow keys to highlight/select your “C:” partition and press the “D” key (pic 6.1). On the next screen press the ‘L’ key (pic 6.2) to confirm that you want to delete partition “C:”, and finalize the deleting of the partition. (if you have only “Unpartitioned space” and you have no C: or D: partitions, skip this step) How to format a computer
Step 7 – Create installation partition
Tutorial 7: Select unpartitioned space and press " C "
Now you should be back on the screen prompted to choose where to install Windows. The box on the lower half of the screen should no longer show a partition, instead of “C:” you should see “Unpartitioned space xxxxxMB”. Select/highlight this with the arrow keys and press the “C” key to create a partition on the drive (this is where you will install windows). Now setup tells you the minimum and maximum sizes the partition can use and lets you pick the size. The default size is the maximum available, leave the default value and press Enter.
Step 8 – Format the computer (the hard disk)
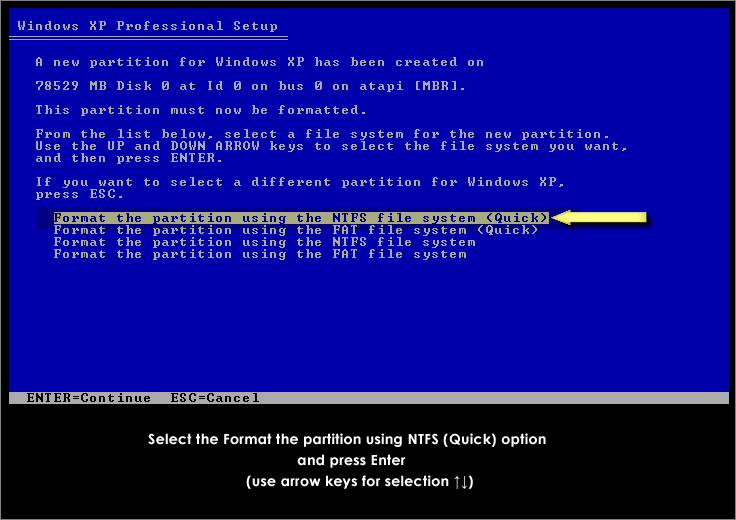
Tutorial 8: Select format using NTFS (Quick) and hit Enter
This screen lets you choose the file system you prefer the drive to be formatted with. Choose NTFS “Quick” (recommended because NTFS is faster and more secure). Use the arrow keys to select and hit Enter. How to format a computer
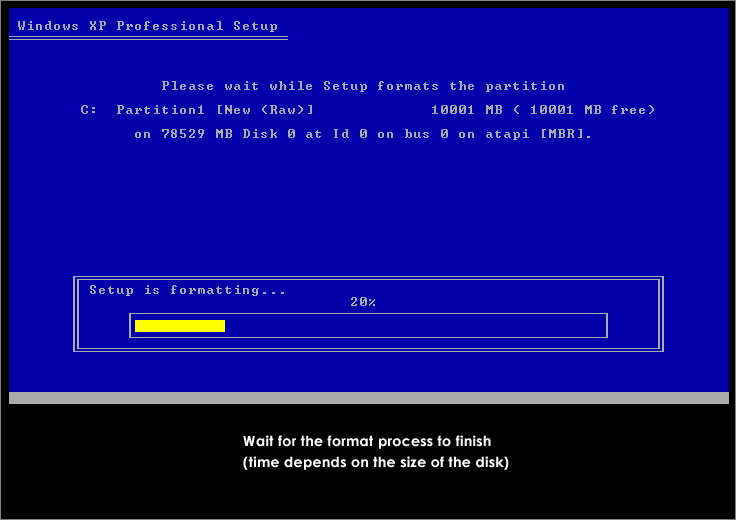
Step 9 – Start Windows XP Setup Setup will start to and will auto-format the “C:” partition, and start with Windows XP installation. From here you are all set and the installation of Windows will proceed. This will take a while. The computer will reboot several times, and will continue with installation. Don’t remove the Windows XP setup CD, and don’t press a key when prompted (we already did that).
Tutorial 9: Setup is formatting
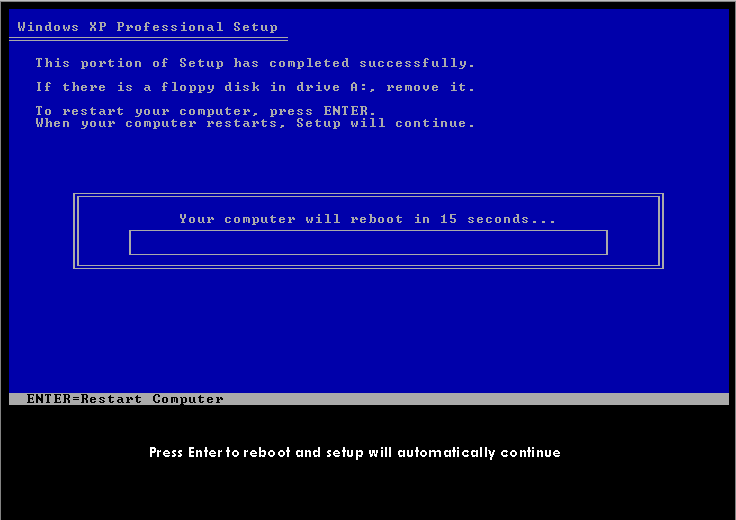
Tutorial 9.2: Setup reboots
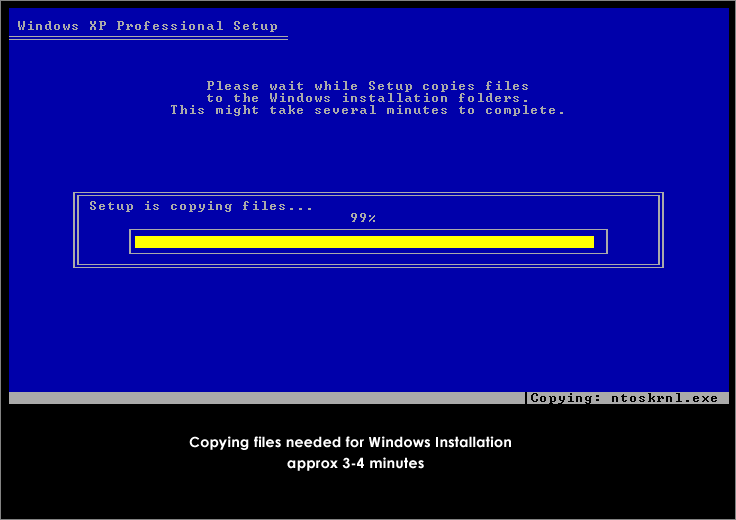
Tutorial 9.1: Copying files needed for windows setup

Thursday, June 2, 2011

Windows keybord shortcut

CTRL and A Selects all the items in the active window.
CTRL and C Copies the item or items to the Clipboard and can be pasted using CTRL and V.
CTRL and F Displays the Find all files dialog box.
CTRL and G Displays the Go to folder dialog box.
CTRL and N Displays the New dialog box.
CTRL and O Displays the Open dialog box.
CTRL and P Displays the Print dialog box.
CTRL and S Displays the Save dialog box.
CTRL and V Pastes the copied item or items from the Clipboard.
CTRL and X Cuts the item or items selected to the Clipboard.
CTRL and Z Undoes the last action.
CTRL and F4 Closes the active document window.
CTRL while dragging an item Copy the selected item
CTRL+SHIFT with arrow keys Highlight a block of text
CTRL+F4 Close the active document
CTRL+ESC Display the Start menu
CTRL and F6 Opens the next document window in the active application.
ALT+ENTER View the properties for the selected item
ALT+F4 Close the active item, or quit the active program
ALT+SPACEBAR Open the shortcut menu for the active window
ALT+TAB Switch between the open items
ALT+ESC Cycle through items in the order that they had been opened
F1 key Gives help on the active window or selected item.
F2 key Rename the selected item
F3 key Search for a file or a folder
F4 key Display the Address bar list in My Computer or Windows Explorer
F5 key Update the active window
F6 key Cycle through the screen elements in a window or on the desktop
F10 key Activate the menu bar in the active program
Windows Logo Display or hide the Start menu
Windows Logo+PAUSE Display the System Properties dialog box
Windows Logo+D Display the desktop
Windows Logo+M Minimize all of the windows
Windows Logo+SHIFT+M Restore the minimized windows
Windows Logo+E Open My Computer
Windows Logo+F Search for a file or a folder
CTRL+Windows Logo+F Search for computers
Windows Logo+F1 Display Windows Help
Windows Logo+ L Lock the keyboard
Windows Logo+R Open the Run dialog box
Windows Logo+U Open Utility Manager
TAB Move forward through the options
SHIFT+TAB Move backward through the options
CTRL+TAB Move forward through the tabs
CTRL+SHIFT+TAB Move backward through the tabs
ALT+Underlined letter Perform the corresponding command or select the corresponding option
ENTER Perform the command for the active option or button
SPACEBAR Select or clear the check box if the active option is a check box
F1 key Display Help
F4 key Display the items in the active list
Arrow keys Select a button if the active option is a group of option buttons
BACKSPACE Open a folder one level up if a folder is selected in the Save As or Open dialog box
END Display the bottom of the active window
HOME Display the top of the active window
NUM LOCK+Asterisk sign (*) Display all of the subfolders that are under the selected folder
NUM LOCK+Plus sign (+) Display the contents of the selected folder
NUM LOCK+Minus sign (-) Collapse the selected folder
LEFT ARROW Collapse the current selection if it is expanded, or select the parent folder
RIGHT ARROW Display the current selection if it is collapsed, or select the first subfolder

Tricks for Hacking Windows Send To Menu

  How often do you copy songs from a CD? Or some photos from a CD?

What do you do? You select the required files and do a CTRL –C. Open the destination folder and do a CTRL-V. Here is something you can benefit time from. Customize your SEND TO MENU.

This sounds simple and you can do it in less than sixty seconds.
You can create your own BASKET.

First you’ll need access to hidden files. So change your view settings to make all hidden files visible.
Tools -> folder options -> view (tab) and select the show hidden files and folders.
go to parent drive:/documents and settings/(user name)/send to

Open up my computer and locate your most used folders.

Create a shortcut of the most used folders in SEND TO FOLDER.You can do this in a number of ways.

Right click -> send to desktop(create shortcut) and move the shortcut from the desktop to the SEND TO FOLDER

Copy the most used folder and go to SEND TO FOLDER and right click -> paste shortcut.

Also remember to rename the shortcuts to send to videos or send to potos. We don’t need confusion when we use the same later.

Change the name of the Recycle Bin desktop icon,

* Click Start then goto Run, write type Regedit and press Enter. It opens Registry Editor. Now in Registry Editor go to:
    * HKEY_CLASSES_ROOT/CLSID/{645FF040-5081-101B-9F08-00AA002F954E}
    * Now Open the ShellFolder folder
    * Change the Attributes data value from 40 01 00 20 to 50 01 00 20. Once completed change the CallForAttributes dword value to 0x00000000 (double-click and change value data to 0).
    * You must change both of these values to get the rename to appear.


Now go to your Desktop & Change your Recycle Bin to anyname you want :-)


Source: http://www.tricksterminal.com/2010/06/rename-your-recycle-bin.html#ixzz0xdGMx96C

Make a invisible folder.

Here’s how:

You can either create a new folder or choose an existing folder. While naming or renaming the folder hold [Alt] Key and enter “0160” (without the quotes). Release the [Alt] Key. You can notice that the name part of the folder is just a blank. What we have done is we have inserted a ‘Non-Breaking Space‘ as the name of the folder virtually making it appear as if the folder has no name. You can’t do this just by typing a space using the space-bar. That doesn’t work. Try it for yourself.

Now right-click on the folder and select “Properties” and choose the “Customize” tab. Click on the “Change Icon” button. Scroll along and you should find a few blank spaces. Click on any one of them and click Ok. That’s it. You can’t see the folder anymore.

Of course, if you select the folder (click on the folder), it will get highlighted.

Show hidden file (if folder option is not working)


Follow this step
  Run>regedit>HKEY_LOCAL_MACHINE\SOFTWARE\Microsoft\Windows\CurrentVersion\Explorer\Advanced\Folder\Hidden\SHOWALL
Delete checkedValue and then 
right clickc> new DWORD VALUE with same name Checkedvalue
next right click on data  value and go to modify and change the vulue
0 with 1
now all hidden file will show